Getting started with Sinch In-app Calling for Android SDK
This guide shows you how to get started integrating your Android application with the In-app Calling SDK. Because we're just getting started, this guide only covers how to sign in to the In-app Calling SDK and how to make and receive audio calls. For more complex examples and documentation, check inside the SDK package file or look at our tutorials.
Prerequisites
- Android Studio and Android SDK tools available here.
- In-app Calling SDK for Android.
- For convenience 2 physical Android devices (however 1 physical and 1 emulator is enough for testing purposes)
Create Android Studio project
Create a new Android Studio project using the 'Empty activity' template.
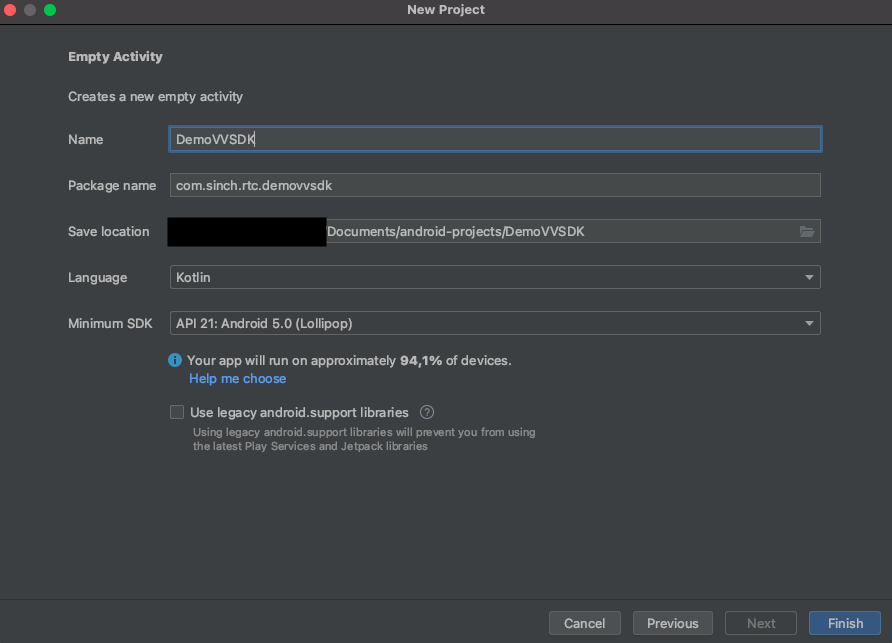
Notes:
- Although Sinch In-app Calling SDK is written in Java, you can use Kotlin as your development language.
- The name of your application doesn't need to correspond to the one provided in the Sinch Dashboard.
Add Sinch Voice and Video SDK to your Android application
- In your web browser, go to Sinch SDKs Download page.
- Find the Android SDK for Java, download the zip file and extract it.
- Along with the library itself, the package also contains documentation and sample applications. For the purpose of this tutorial only the aar file is needed. Locate it inside the 'libs' folder and copy it to your clipboard.
- Paste it to
<your android application name>/app/libsdirectory.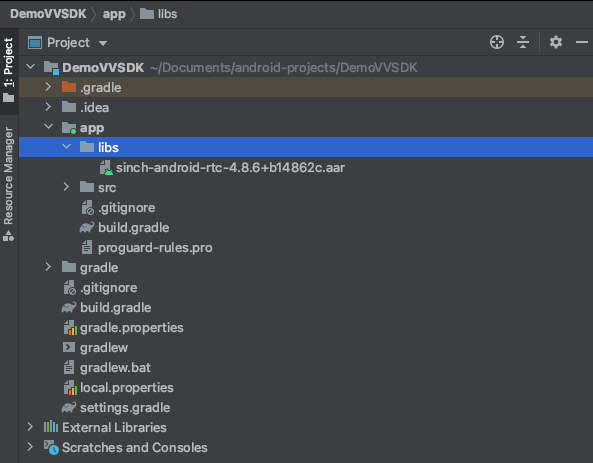
- Edit your app's build.gradle file located under
app/build.gradleto include the following: app/build.gradle
   repositories {
       flatDir {
           dirs 'libs'
       }
   }

   dependencies {
       implementation(name:'sinch-android-rtc', version:'+', ext:'aar')
       ///
}- You should see a message that gradle files have changed. Click Sync now and wait for Android Studio to adopt your changes.
Interacting with Voice and Video SDK
The SinchClient object is the main SDK entry point. Once created it's used to provide various SDKs features such as video, audio or PTSN calls. We recommend to initiate SinchClient once and retain its instance during the whole lifetime of the running application. That's why instead of placing it inside Activity or Fragment classes we recommend to put it inside a Service component.
- Create a new Kotlin class that extends Service component (don't forget to define the service in your AndroidManifest.xml file).
- Add
SinchClientinstance as a member variable. - Create a function that builds the client.
The result of these steps is demonstrated below:
app/src/main/java/com/sinch/rtc/demovvsdk/SinchService.kt
class SinchService: Service(), SinchClientListener, CallClientListener {

    companion object {
        private const val APP_KEY = "enter-application-key"
        private const val APP_SECRET = "enter-application-secret"
        private const val ENVIRONMENT = "ocra.api.sinch.com"
    }

    private var sinchClient: SinchClient? = null
    private var userId: String = ""

    private fun startInternal(username: String) {
        if (sinchClient == null) {
            createClient(username)
        }
        sinchClient?.start()
    }

    private fun createClient(username: String) {
      userId = username
        sinchClient = Sinch.getSinchClientBuilder()
            .context(this)
            .applicationKey(APP_KEY)
            .environmentHost(ENVIRONMENT)
            .userId(username)
            .build()
            .apply {
                setSupportManagedPush(true)
                addSinchClientListener(this@SinchService)
            }

    }
    ///
}
Along with extending Service, the SinchService component also implements SinchClientListener which provides callbacks connected to Sinch client lifecycle managment.
To make this example work for you, you need to update some values:
| Parameter | Your value |
|---|---|
APP_KEY | You can find your key on your dashboard. |
APP_SECRET | You can find your secret on your dashboard. Your secret is only available to view right after creating your key, so make sure you copy it somewhere safe. |
There are a few other elements to notice:
- The
environmentHostparameter is the endpoint of the REST API the SDK is targeting. - The
UserIdparameter is the user identifier to register within your application (the specific value will be provided after clicking Login button in the Android application). - The
setSupportManagedPushparameter enables or disables the functionality of receiving notifications about incoming calls even when the application is not in the foreground. Extensive information about how to add this capability to your application can be found here.Note:
It's almost certain that your production application should enable this feature. If not enabled it won't be possible to get notified about incoming calls.
When starting the Sinch client, SinchClientListener's onCredentialsRequired method executes. Inside this callback you must provide a signed (with your application secret) JWT token. In a production application the token should be generated on your backend infrastructure. Most importantly you shouldn't put your app secret value into your Android application source code. More information on that topic can be found in Authentication & Authorization and Authorizing the Client sections.
Just for this step-by-step guide purpose we will mimic a backend authentication server behaviour with a helper JWT class that creates the token based on userId and your application credentials locally and then passes it back to Sinch SDK:
override fun onCredentialsRequired(clientRegistration: ClientRegistration?) {
    clientRegistration?.register(JWT.create(APP_KEY, APP_SECRET, userId))
}
Implementation of the JWT class can be found in any of samples provided with the SDK package.
(For example, check out samples/sinch-rtc-sample-video/src/com/sinch/android/rtc/sample/video/JWT.java)
Communication between views and service
To communicate between your application view layer (activities and fragments) and the Sinch client that lives inside the Service instance, we implement a bound service pattern. Information about what's a bound service and how it works can be found on the official Android SDK documentation website.
- Inside
SinchServicecreate an inner class that extendsBinder. - Add basic functionality that allows the application to start Sinch client for a given username and provide a way to be notified about the initialization result:
app/src/main/java/com/sinch/rtc/demovvsdk/SinchService.kt
private var sinchClientInitializationListener: SinchClientInitializationListener? = null interface SinchClientInitializationListener { fun onStartedSuccessfully() fun onFailed(error: SinchError) } inner class SinchServiceBinder : Binder() { fun start(username: String) { startinternal(username) } fun setClientInitializationListener(initializationListener: SinchClientInitializationListener?) { sinchClientInitializationListener = listener } } - Override
onBindmethod to returnSinchServiceBinderapp/src/main/java/com/sinch/rtc/demovvsdk/SinchService.kt
private val sinchServiceBinder = SinchServiceBinder()

override fun onBind(intent: Intent?): IBinder {
    return sinchServiceBinder
}
Logging into the application
When the user starts the application, usually they must enter a username that will be passed as userId and used to create a Sinch client. The username they choose will then be used as a callee identifier for making the actual audio call.
- Rename
MainActivityandactivity_main.xmlfiles inside AndroidStudio (that were initially created after setting up the project) toLoginActivityandactivity_login.xml. Right click on the filename and chooseRefactor -> Rename. - Create a simple layout containg EditText (for entering the username) and login button.
app/src/main/res/layout/activity_login.xml
<LinearLayout android:layout_width="wrap_content" android:layout_height="wrap_content" android:orientation="vertical" android:gravity="center" app:layout_constraintBottom_toBottomOf="parent" app:layout_constraintLeft_toLeftOf="parent" app:layout_constraintRight_toRightOf="parent" app:layout_constraintTop_toTopOf="parent" > <TextView android:layout_width="match_parent" android:layout_height="wrap_content" android:text="Enter your username"/> <EditText android:id="@+id/enterUsernameEditText" android:hint="Enter username" android:layout_width="match_parent" android:layout_height="wrap_content"/> <Button android:id="@+id/loginButton" android:text="Enter" android:layout_width="match_parent" android:layout_height="wrap_content"/> </LinearLayout> - Inside the
LoginActivityfile first bind to the Sinch client service by callingapp/src/main/java/com/sinch/rtc/demovvsdk/LoginActivity.kt
bindService(
    Intent(this, SinchService::class.java),
    this,
    BIND_AUTO_CREATE
)
Note that as a second argument
LoginActivityis passed, meaning it has to implement the Service Connection interface. - Inside
onServiceConnectedcallback assign provided binder to a local variable for later usage for communicating with the service and assignLoginActivityas a listener to get notifications about success or failure when starting Sinch client.app/src/main/java/com/sinch/rtc/demovvsdk/LoginActivity.kt
private var serviceBinder: SinchService.SinchServiceBinder? = null override fun onServiceConnected(componentName: ComponentName?, binder: IBinder?) { serviceBinder = binder as SinchService.SinchServiceBinder? serviceBinder?.setClientInitializationListener(this) } override fun onStartedSuccessfully() { Log.d(TAG, "onStartedSuccessfully") } override fun onFailed(error: SinchError?) { Log.e(TAG, "SinchClientInitializationListener error $error") } - Finally assign the login button a click listener that initiates and starts the Sinch client by passing the provided username:
app/src/main/java/com/sinch/rtc/demovvsdk/LoginActivity.kt
private lateinit var binding: ActivityLoginBinding override fun onCreate(savedInstanceState: Bundle?) { super.onCreate(savedInstanceState) binding = ActivityLoginBinding.inflate(layoutInflater) setContentView(binding.root) binding.loginButton.setOnClickListener { serviceBinder?.start(binding.enterUsernameEditText.text.toString()) } } - Return to SinchService implementation. Inside
onClientStartedandonClientFailedcallbacks ofSinchClientListenersimply pass the result to thesinchClientInitializationListener.app/src/main/java/com/sinch/rtc/demovvsdk/SinchService.kt
override fun onClientStarted(p0: SinchClient?) { sinchClientInitializationListener?.onStartedSuccessfully() } override fun onClientFailed(p0: SinchClient?, p1: SinchError?) { sinchClientInitializationListener?.onFailed(p1) } - Before launching the application declare 2 permissions inside your
AndroidManifest.xmlfile that are required to start the SinchClient:app/src/main/AndroidManifest.xml
<uses-permission android:name="android.permission.INTERNET"/> <uses-permission android:name="android.permission.ACCESS_NETWORK_STATE"/> - Run the application, enter a username of your choice and verify your logcat output. You should see that the client was started successfully.
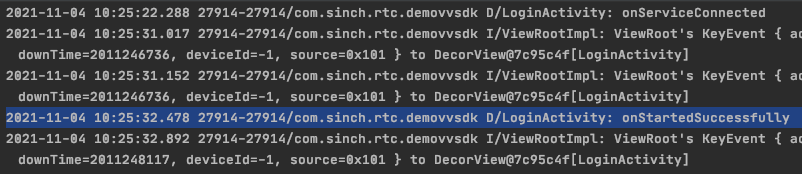
Note:
Again, in case of a real world application you would probably want to store the username inside some sort of a persisted storage but for the simplicitly of this guide we present just the basic steps that don't cover all the functionalities and aspects of a production application use cases, error management, and Android lifecycle handling.
Next steps
Now that your application is created, you can configure that application to make a call.
