Handling incoming calls
In the previous section we added the capability of initiating the call. This section describes how to receive notifications and handle incoming calls.
If you haven't yet initiated a call, go back and follow the steps in that section.
Note:
To test if the call succeeded and audio connection is established, it's best to have 2 physical Android devices however you can initiate the call on the emulator.
Setting up FCM push notifications
To receive notifications about incoming calls, you must set up your application to work with either FCM or HMS Push Notification Platform. Information about how to add this capability and comparison of these platforms can be found here. For this step-by-step guide we showcase FCM and assume that you have your google-services.json file generated and downloaded.
-
Copy your 'google-services.json' file to
<your android application name>/app/directory. -
Create
FCMServiceclass that extends FirebaseMessagingService. Declare the service inside AndroidManifest.xml file.app/src/main/AndroidManifest.xml
<service android:name=".FCMService"> <intent-filter> <action android:name="com.google.firebase.MESSAGING_EVENT" /> </intent-filter> </service> -
Inside service's
onMessageReceivedcallback make sure the payload received indicates an incoming call. If it does, pass it to bound SinchService and let the Sinch client handle notifying the observers.app/src/main/java/com/sinch/rtc/demovvsdk/FCMService.kt
override fun onMessageReceived(remoteMessage: RemoteMessage) {
    super.onMessageReceived(remoteMessage)
    val data = remoteMessage.data
    if (SinchHelpers.isSinchPushPayload(data)) {
        object : ServiceConnection {
            private var payload: Map<String, String>? = null
            override fun onServiceConnected(name: ComponentName,
                    service: IBinder) {
                payload?.let {
                     (service as SinchService.SinchServiceBinder).
                        relayRemotePushNotificationPayload(
                    it
                    )
                }
                payload = null
            }

            override fun onServiceDisconnected(name: ComponentName) {}
            fun relayMessageData(data: Map<String, String>?) {
                payload = data
                applicationContext.bindService(
                    Intent(
                        applicationContext,
                        SinchService::class.java
                    ), this, BIND_AUTO_CREATE
                )
            }
        }.relayMessageData(data)
    }
}
Note:
This implementation of
FCMServiceshows only most basic message handling use case. For more advanced usage checksinch-rtc-sample-pushsample. -
Modify SinchService binder by adding method forwarding push payload to Sinch client.
app/src/main/java/com/sinch/rtc/demovvsdk/SinchService.kt
inner class SinchServiceBinder : Binder() {

    fun relayRemotePushNotificationPayload(map: Map<String, String>) {
        sinchClient?.relayRemotePushNotificationPayload(map)
    }

}
Listening for incoming calls
-
Inside the Service binder class add a method responsible for adding a
CallClientListenerto call client:app/src/main/java/com/sinch/rtc/demovvsdk/SinchService.kt
fun addCallClientListener(callClientListener: CallClientListener) { sinchClient?.callClient?.addCallClientListener(callClientListener) } fun removeCallClientListener(callClientListener: CallClientListener) { sinchClient?.callClient?.removeCallClientListener(callClientListener) } -
Once connected to the service add LoggedInActivity as a
CallClientListenerapp/src/main/java/com/sinch/rtc/demovvsdk/LoggedInActivity.kt
override fun onServiceConnected(p0: ComponentName?, binder: IBinder?) { serviceBinder = binder as SinchService.SinchServiceBinder? serviceBinder?.addCallClientListener(this) } -
Implement
onIncomingCallcallback asking user if he wants to accept or decline the call:app/src/main/java/com/sinch/rtc/demovvsdk/LoggedInActivity.kt
override fun onIncomingCall(p0: CallClient?, call: Call?) { Log.d(TAG, "onIncomingCall $call") AlertDialog.Builder(this).setMessage("${call?.remoteUserId} calling") .setPositiveButton("Accept") { _, _ -> call?.answer() } .setNegativeButton("Decline") { _, _ -> call?.hangup() }.show() } - Build and run the application on both devices. Log into the application providing 2 different usernames (TestCaller and TestCallee).
- On the first device enter TestCallee as the 'callee name' and press CALL .
-
On the second device you should see a popup asking if you want to accept or decline the call.
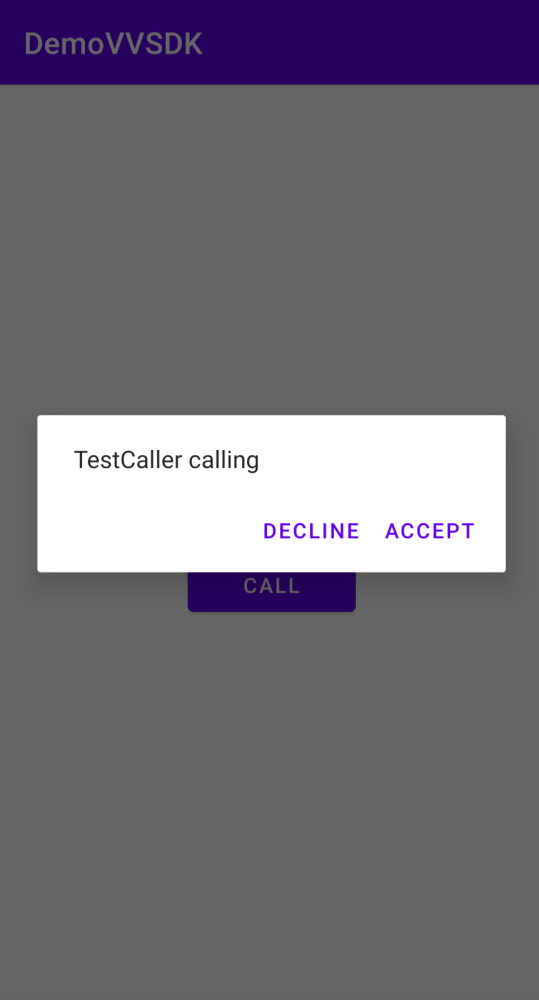
- Press Accept and begin your conversation!
Ending the call
Once the connection is established users should be able to finish the conversation. We will implement this feature by adding a simple button visible only after answering the call.
-
Inside
activity_logged_in.xmlfile define a button that stays initially hidden:app/src/main/res/layout/activityloggedin.xml
<Button android:id="@+id/hangupButton" android:layout_width="wrap_content" android:layout_height="wrap_content" app:layout_constraintBottom_toBottomOf="parent" app:layout_constraintStart_toStartOf="parent" app:layout_constraintEnd_toEndOf="parent" android:visibility="gone" android:text="hangup"/> -
Create 2 methods responsible for handling hangup button state inside
LoggedInActivityapp/src/main/java/com/sinch/rtc/demovvsdk/LoggedInActivity.kt
private fun setupHangupButton(call: Call?) { binding.hangupButton.isVisible = true binding.hangupButton.setOnClickListener { call?.hangup() } } private fun disableHangupButton() { binding.hangupButton.apply { isVisible = false setOnClickListener(null) } } -
Modify
LoggedInCallListenerwe defined in the earlier step. Once the call is established setup the hangup button logic, and once it's ended disable it:app/src/main/java/com/sinch/rtc/demovvsdk/LoggedInActivity.kt
override fun onCallEstablished(call: Call?) { Log.d(TAG, "onCallEstablished") setupHangupButton(call) } override fun onCallEnded(call: Call?) { Log.d(TAG, "onCallEnded ${call?.details?.endCause}") disableHangupButton() } -
Finally on the callee side, after answering the call we need to add an instance of the call listener to the call object itself. It's important to understand that in that case there are 2 call listeners alive. First one at the caller site (added via
serviceBinder?.addCallClientListener(this)method invocation) notifying about state of outgoing call and the second one, on the callee site added once the call is answered:app/src/main/java/com/sinch/rtc/demovvsdk/LoggedInActivity.kt
AlertDialog.Builder(this).setMessage("${call?.remoteUserId} calling")
   .setPositiveButton("Accept") { _, _ ->
       call?.answer()
       // Adding second CallListener instance
       call?.addCallListener(LoggedInCallListener())
   }
   .setNegativeButton("Decline") { _, _ ->
       call?.hangup()
   }.show()
Next steps
Now that you've built a simple app to make and receive calls, learn more about the Android SDK.
